Mac OSX dialup Setup
Configure Mac OS X for a Dial-up Connection***
Macintosh OS X
Note: Support of users who install to a custom directory location or otherwise deviate from these instructions may be limited. Documentation is written to support installation and configuration using default directories and layouts as described below. Technical Support strongly recommends you follow these directions carefully and accurately.
This document provides instruction on dial-up PPP connection configuration in Mac OS X.
Information about Mac OS X Dial-up Services
Mac OS X can be installed in a number of different configurations, most customarily with the "classic" environment included, running Mac OS 9.x. Configuration of dial-up networking is handled exclusively by Mac OS X. Do not attempt separate configuration of the classic (9.x) environment when booted in Mac OS X, even if such control panels appear accessible and configurable. Do not attempt installation of third party dial-up applications, such as FreePPP.
Apple recommends system configuration through Setup Assistant, which automatically starts when the Mac OS X system is booted for the first time. Setup Assistant prompts the user for basic set up information, including network settings and Admin password. The Admin password allows the Network Settings to be reconfigured at a later date. Without this password, settings may be viewed but not altered. Setup Assistant cannot be run again after initial set up. All subsequent configuration must be done through System Preferences.
Configure Dial-up Connectivity through System Preferences
-
Click on the Apple Menu, choose System Preferences.
-
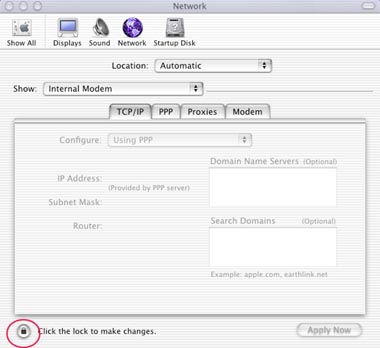
Click on Network.
-
If network settings are greyed out as shown below, click on the lock icon in the lower left corner of the panel to enter admin password. If the area is not greyed out, proceed to step 5.
-
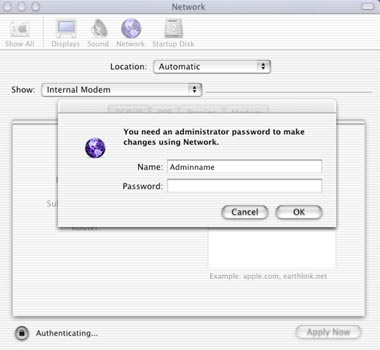
The administrative name field will default to the primary administrator defined during initial set up. Enter the primary administrator password, or enter name and password for an alternate administrator account. Click OK.
-
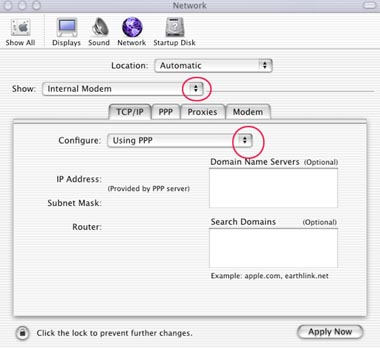
Choose the dial-up configuration, by clicking on the double arrows next to the Show field. Choose Internal Modem for factory installed internal modems, or Modem/Printer Port for external modems.
Note: Most Macintosh systems include internal modems.
-
In the Configure field, click on the double arrow next to the field, and choose Using PPP. Do not enter anything in Domain Name Servers or Search Domains.
-
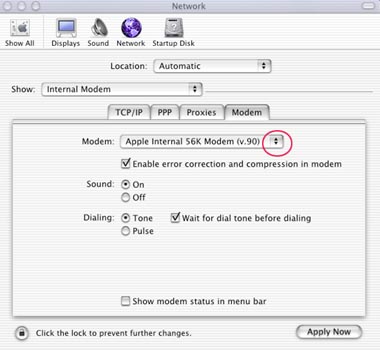
Click on the Modem tab.
-
Click on the double arrows next to the Modem field and choose the name which corresponds to the workstation's modem.
Note: If configuring the Apple Internal 56K Modem for use with the MOREnet CONNECT modem pools, select Nifty - Apple Internal 56K Modem (v.34). Other modems may need to turn off error correction and compression in modem by unchecking the selection shown above.
-
Click on the PPP tab.
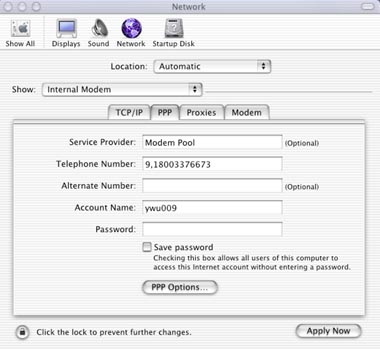
-
Enter an identifying name for your dial-up service in the Service Provider field.
-
Enter the telephone number for the modem pool in the Telephone Number field. Include any required dialing prefixes or area code. If a pause is needed for prefix dialing, add a comma between the prefix and the main number. Call waiting should be turned off with the proper prefix.
The telephone number 770-246-0961.
-
Enter the User ID in the Account Name field.
-
Leave the password area empty, and the Save password box unchecked. The PPP password should be entered every time you connect. Saving the password would allow anyone to use your account from this system.
-
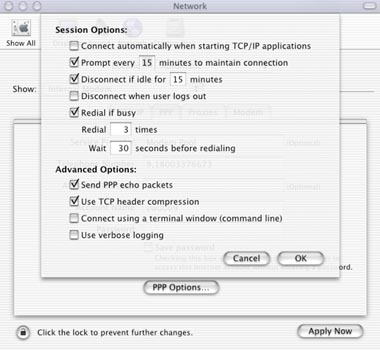
Click the PPP options button.
-
Make sure the option Connect automatically when starting TCP/IP applications is not checked. Leave other options checked as shown. Click OK.
Important Note: By default, the selection Connect automatically when starting TCP/IP applications is not selected. Selecting this option in MacOS X will often cause the workstation to attempt to make a dial-up connection automatically. In tandem with a saved password, the system can dial-up a modem pool, and consume limited time assigned to a user. Manual connect and disconnect insure you control when the resource is used, and this method is given in this document.
-
Click the Apply Now button, and close Network Preferences with the close box in the upper left hand side of the window, marked with a red "x".
Check the Connection
-
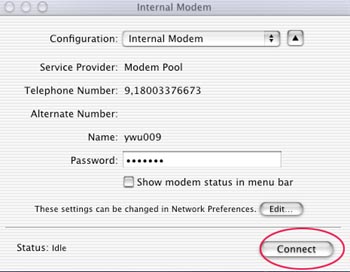
If the connection is to be initiated and disconnected manually, the Internet Connect Application, available in the Applications folder on the hard drive, must be used.
Note: For convenient access to Internet Connect, provide an alias to the application on the Mac OS X dock. Find the Internet Connect application in the Applications folder. Click and hold on the Internet Connect icon, and drag to the light blue dock area at the bottom of the desktop. Release anywhere on the dock to the left of the white line. The new icon for Internet Connect, pictured as a yellow book with a telephone receiver, can be double-clicked at any time to launch the Internet Connect application. When the application is active, a black triangle will be shown under the application icon.
-
Launch the Internet Connect application from the dock or Applications folder.
-
Enter your password, and click Connect to make a dial-up connection.
-
When connection has been established in the bottom of the Internet Connect window, launch an Internet application, such as Internet Explorer, to check the connection.
-
To end the dial-up session click Disconnect.