Setting
up the connection
1. Double-click the
"My Computer" Icon.
2. Double-click the "Dial-Up Networking" Icon.
3. "Make New Connection" may open automatically, if it
doesn't, double-click on Make New Connection.
4. Type in "Abraxis" for the name of the computer you
are dialing.
5. Click
"Next".
6. Type in the phone number for your dial-in connection (Consult
your Abraxis configuration sheet for the correct phone number to
enter).
7. Click "Next", then "Finish".
8. Single-click the new Abraxis Icon with the RIGHT mouse button,
and select Properties.
9. In the Phone section, make sure the "use Country
Code and Area Code" option is NOT checked.
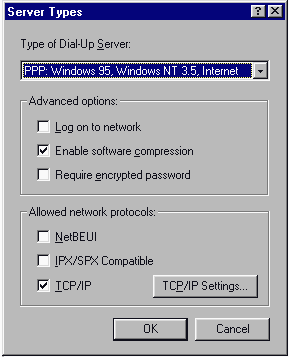
10. Click the "Server Type" button.
11. The type of Dial-Up Server should be set to "PPP:
Windows95, WindowsNT 3.5 Internet.
12. In the Advanced Options Section, make sure:
Log onto Network IS NOT
checked
Enable Software Compression IS checked
Require Encrypted Password IS NOT checked
13. In the Allowed Network
Protocols Section, make sure:
NetBUEI IS NOT
checked
IPX/SPX IS NOT checked
TCP/IP IS checked

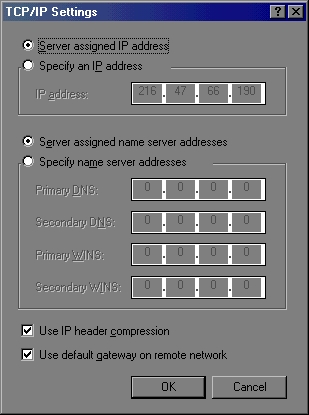
14. Click on "TCP/IP
Settings".
15. Make Sure "Server Assigned IP Address" is selected.
16. Make sure "Server Assigned Name Server Addresses" is
selected,
17. "Use IP Header Compression" should be checked
18. "Use Default Gateway on Remote Network" should be
checked

19. Click "OK" until you have returned to the
"Dial-Up Networking" window.
| Optional: Create a
shortcut to the Abraxis Dialer by dragging its Icon onto
the desktop. When the computer warns you that you cannot
move or copy the item, select "Yes" to create a
shortcut. |
Final Step:
Connecting!
1. Double click on the
Abraxis Icon (or the shortcut you created).
2. Enter in your username and password.
3. Click "Connect" to log onto Abraxis!
|